Friday, May 30, 2008

Gah! I have been attacked....

...by the evil Squash Borer! Witness the evil beasties:


and the destruction they have wrought upon my zucchini plant:


My zuchinni plant wasn't looking so hot - leaves turning a sickly yellow - and upon inspection I found that one of my plants had been invaded by the Squash borer. The Horror! I frantically dug them out, but I fear it may be too late for this particular plant. I still have 2 Apparently uninfested plants left - daily monitering will henceforth commence ('cause I am sure they are there - I just can't see them).

Evil, nefarious Squash-Vine Borer!


(thanks to University of Kentucky Entomology for the pic).

Thursday, May 29, 2008

The backyard tour...

As opposed to my front yard - which is pretty to look at, my backyard is more of what I like to think of as a 'Working garden'. It has a small Potager garden, an area with a sandbox for the kid, flowers for picking, and grass for the kid to run about on. It is still very much a work in progress, but a friend back home asked me to post photos of the backyard, so here goes....

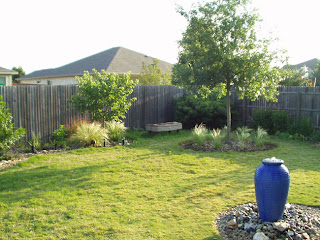
The view from my back porch:


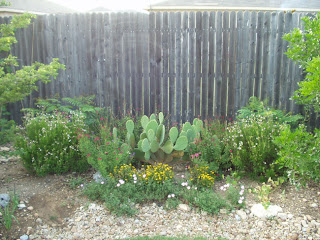
I would like to put a little circular patio just to the right of the orchid tree and in front of the cactus/flower bed one of these days.

A little closer:


A closer view of the Potager garden:


Now looking to the right a bit:


A little wider view (wow...my yard looks bigger than it really is - what do they say? - the camera adds 10 pounds, or 10 feet of area in this case):


The windmill palm next to my back porch:


This area was really difficult for me to figure out what to do with. It was shady and the grass would not grow there, it tended to flood when it rained (I have since dug a drainage ditch for the water to flow out under the fence), and the earth was a mix of black gumbo and caliche...oh, and the area was so small - AND it was right next to the back porch so I wanted it to look fairly nice - what the heck do I put there?

My solution was to dig out the half-dead grass, remove a section of earth and replace it with better soil. Then I planted a Windmill palm (very freeze hardy) and recently bought some iron hooks I attached to the fence behind it, where I hung up some fabulous Boston ferns (I love ferns!)Looking closely, you can see the shrimp plants I just added in front of the palm. There is also some sedum under the palm that will make a nice green carpet around it as it fills in. As summer progresses a group of Tropical red sage will also fill in around the base of the palm. I let the sage re-seed every year and fill out the area - it is the one thing that seems to love growing in that spot!

Moving on, here is the entrance to my backyard (yes,I need to mow):


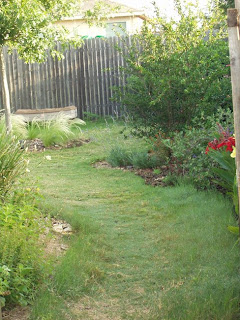
Another angle of the entrance so you can see the dwarf Canna in the background:


A view of what you see when you enter and turn to the left:


Moving out and looking back at the gate you can see the Eve's Necklace tree with native River Fern and Silver Ponyfoot beneath:


Turning to the right there is a path to follow that leads you past the coneflowers and past the sandbox. There will be a stand of sunflowers along the fence behind the sandbox come summer:


Another shot of the coneflowers:
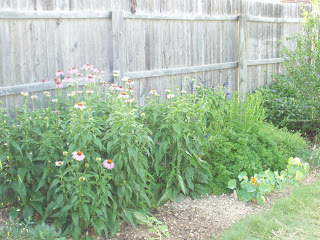


And even closer:


As we come around the circular path and look back:


Moving back towards the porch and looking out, you can see the disappearing fountain I just put in. I will be digging out an area around this for a flower bed and I also will be adding a stone path that goes from the gate, past the fountain, and to the back porch.


You know, I don't plan garden paths, they just sorta, well, develop on their own. I may add some stones to the path after the fact, but really the garden dictates where the paths should go.

So there you have it. The entire backyard was NOTHING but grass 5 years ago. I have been doing A LOT of digging. My trusty straight-edge shovel and pick axe are my two backyard gardening companions.

Well, that pretty much concludes the tour. Not terribly spectacular, but as I said - it is a work in progress. Always. I hope you all enjoyed it ;)

Monday, May 26, 2008

Random garden tidbits

The weather has been hot and toasty lately. Last week it was in the low hundreds and this week it is in the upper nineties and HUMID - yuck. I am thinking it is going to be one roasty-toasty summer this year! My plants are doing OK so far.

The Canna have really started blooming. My yard is small, so I only have the dwarf canna. I would love to have some of the ginormous ones, but I have no place for them. Here is the dwarf red one blooming away:


I simply LOVE blue flowers. I think they add a cool feeling in the hot, hot summer. Some of these just started blooming and should continue throughout the summer.

My dwarf blue morning glories:


And the Wright's Skullcap (OK, so maybe these are a bit more purply-ish. True blues are hard to find):


Then there is the silver pony-foot which is kinda blue-silvery:


My christmas cactus (Cylindropuntia leptocaulis) finally has blooms this year! I bought a little tiny one 3 years ago and have been patiently waiting for it to get big enough to flower:


Oh! And I just harvested my first Zucchini the other day:


I caught a gecko munching down on a moth the other evening. Yum!:


And - Omigosh! I just saw a Painted Bunting in the backyard! Of course my damn crappy camera was too slow to get a picture of it, so you are just going to have to take my word for it.

Here is what they look like (thanks to Encylopedia Britannica for the pic):


Painted Bunting facts according to Cornell Lab of Ornithology:

With bright blue, green, and red plumage, the breeding male Painted Bunting is one of the continent's most gaudily colorful birds. The species breeds in two different populations, one in the south-central United States, and one along the seaboard of the southeastern states.

Description:
Small, bright finch.
Male unmistakable with red chest, blue head, and green back.
Female bright greenish yellow.

Size: 12-13 cm (5-5 in)
Weight: 13-19 g (0.46-0.67 ounces)
Sex Differences
Male brightly colored, female drabber and entirely green.

Sound:
Song is high-pitched, thin, and sweet, consisting of short phrases of variable pitch. Call is a soft rising chip.

Conservation Status:
Breeding Bird Survey data show a steady decline in overall population since 1965. Males are targets of trappers for the cage-bird trade, especially in Mexico. Listed as a species of special concern on the Partners in Flight WatchList.

I still can't believe I just saw one of these! Awesome. I SO need to get myself a new digital camera that thinks faster and takes better photos so I can catch him on camera next time.

Friday, May 23, 2008

The Transformation

As I was strolling around my garden yesterday, I was thinking about how my yard has been transformed from a monoculture bermuda grass landscape into a place of gardening goodness. I dug around and found a photo of the house when we first bought it:


A blank canvas for sure! That tiny Japanese false oak tree in the front there was given a quick death by hack-saw and replaced by a Texas Ash. I have spent the last 5 years slowly ripping up grass and replacing it with drought tolerant natives and adapted plants.

The front yard as it appears today:


I lost several plants in the deluge that was last spring, those have been replaced but are still kinda small. I also extended this bed out this spring and so those items haven't filled in yet. It should fill out quite a bit by the end of the summer.

A few other angles:


And here is the west side of the house. All the grass has been removed and replaced with native and adapted trees and plants:


A little closer:


So that is where the yard stands now. It is still a work in progress. I have been getting a lot of compliments lately from the neighbors. They stop and ask what the plants are, how I went about it all, and how much work it is to maintain. They mention how they are thinking of doing the same thing in their yards. Nice! I am starting to feel a little warm and fuzzy inside! I think I might buy some of those little metal plant identifier tag dealies and stick them by the plants. That way, people can just read the tag and know what plant is what. I am spreading the gardening love!

Monday, May 19, 2008

The Disappearing Fountain Project

I have been thinking about adding a fountain to my back yard for quite some time now. It all started when I saw an episode on 'Central Texas Gardener' that was all about disappearing fountains and what you needed to build one. They made it look so easy! So, last week I took the plunge. I made a trip to the Hill Country Water Gardens in Cedar Park and picked up a keen blue jar and all the parts to assemble my very own disappearing fountain. I talked to the guy there, and he was super-helpful and answered all my questions and showed me how to put together the fountain. Easy as Pie! I can totally do this. I am no stranger to a pick-axe. Here is how it went down:

Part One: The Acquisition

1. I picked out the jar. I knew I wanted one of those ripply ones and blue is my favorite color, so I sized up the jars and picked out a medium one.
The Blue Jar:


2. Get the right size pump. I picked out a pump that would make a nice bubbly fountain - not too big - not too small (pricey little buggers!):


3. Acquire other pond making accessories: With assistance from the nice pond guy, I got the right size reservoir for the jar, the grate that goes on top of it, the screen that goes on top of that, some tubing to connect jar and pump, and oh - some concrete blocks to support the jar. I also picked up some pond rocks to cover the grate.

4. Have the nice gentlemen at the pond place drill a hole in the bottom of the nifty blue jar and attach the socket for the tubing. Also have the guy cut out an access hole in the grate for the pump. They did all this for me while I waited.

5. As said jar and accessories were being modified, I paid for my new project and then sat around waiting for them to finish up the drilling and cutting and loading all the goodies into my car. It took about 15 minutes. I entertained myself by jamming to my favorite tunes - my selection for the day: 'The Detroit Cobras'.

6. Drive home very carefully - I had to take the turns very slowly as jars tend to roll about.

Now for the hard work. Here is how you put it all together.

Part Two: The Assembly

1. Get a sturdy pick-axe and dig a hole so that the reservoir sits in the ground with an inch to a couple of inches still above the ground. If there is a flood, you don't want dirty water flooding into the reservoir.


2. Set the reservoir in the ground and use a level to get it as even as possible. You want to make sure the jar will sit level so the water flows evenly down and around the sides of it. Once it is level, set the concrete blocks down in the reservoir so the jar has something sturdy to sit on.


3. Fill the dirt in around the reservoir so it stays put. Arrange the grate on top so you have the access point where you want it. The pump will go just under this access point in the reservoir. Set the dirt screen on top and cut a hole in the center where the tubing will match up to the bottom socket in the jar.


4. Have an assistant set the jar in the center and hold it up a bit (or more correctly, TIP it up - they are heavy!) so you can attach the tubing to the socket in the bottom of the jar. Then attach the other end to the pump. Set jar down CAREFULLY.


5. Fill jar with water. Yay! Once the pump is submerged and the jar filled, plug in the pump. Test to make sure the water is flowing properly around the jar. If the jar is not quite level, jam a couple thin rocks underneath to level it out. And..Tah-Dah! Your very own disappearing fountain.


6. Add rocks on and around the reservoir to mask it and make it look fancy.


See? Easy as Pie!

Saturday, May 17, 2008

Young Gardeners Do So Exist!

Alright, I am so tired of hearing about how young people do not garden or if they do, they didn't start until they get out of college and then garden because they think it is 'trendy'. I am here to say that I am in my early thirties (which apparently makes me a 'youngster'); and yes, I went to college (and had container gardens at my apartment), and I have been gardening as long as I can remember. I don't do it to be 'trendy' and I am not going to get bored of it and give it up tomorrow because I failed at growing one or two items. I garden because I love it. My day is not complete until I get my hands and toes covered in mud/dirt.

I know lots of people who enjoy gardening that are in their 20s and 30s. We are out there and WE DO EXIST. Gardening is not going to go the way of the Dodo or the Moa anytime soon. Maybe more of us are in apartments because we cannot afford a Mcmansion with an acre of land to plant large-scale gardens on; and therefore maybe we spend more time container gardening than building a Victorian garden. It is still gardening and it still counts. Give us a little credit.

Sure, maybe it seems like a lot of young people today have lives that are too busy to stop and smell the roses, but maybe no one ever took the time to SHOW them how to stop and smell the roses. Or why they SHOULD. Share the gardening knowledge with your friends - young and old. Gardening has no age limits as far as I am concerned.

I learned from my parents and my grandparents. My grandmother took me around her garden and pointed out all the plants and their scientific names. My mother gave me my own little 4x4 foot plot of dirt to plant flower seeds in when I was a little kid. I dug the rows, I planted the seeds, I watered it, I weeded it, and I got to pick the flowers whenever I wanted. It was my domain and I loved it. If one wants young people to become interested in gardening, give them a plot, or a pot, or heck - a foam cup; give them seeds, show them the way and let them have at it. Have you ever seen how happy little kids are when they come home with that bean sprout they grew in class? They are elated. They just need someone to nuture that curiosity about nature and how it all works.

Gardening is addictive. Trust me. We had a huge garden when I was a kid. The neighbor kids would run home tell their parents they wanted to grow stuff just like so and so across the street, and pretty soon little garden plots were popping up everywhere. Kids love that stuff. They just need someone to teach them.

So, to all the people out there moaning about the younger crowd not wanting to keep the art of gardening alive - take some action and share the knowledge. Let the neighbor kid smell the flowers in your yard (even let them pick one or two if you are feeling extra generous that day) You might be surprised how receptive young people will be. Share the love, man. Share the love.

Thursday, May 15, 2008

Bloom Day - May 15th

First off - WOW! What a storm we had last night! Some parts of Austin got pummeled, while others just got skirted by the winds. We were under a Tornado Warning with a storm bearing down on our house that had already produced a funnel cloud or two. We dragged everything that wasn't tied down into the garage and waited for the storm to hit. 80-100 mile an hour straight line winds they said. We were all ready to run into the center hall closet and hunker down in there. The sky was alive with lightning and there was so much thunder, I thought for sure the Gods were in the midst of a championship bowling tournament!

When the storm did hit - almost NO wind! Crazy I tell you. We did get torrential rains and hail however. See, that is how it works - take the time to prepare and nothing bad happens - don't lift a finger, and your house has its roof torn off. I guess the winds just skirted us - what a break! Later on overnight and into the morning we did get some pretty crazy winds and more torrential rains, though nothing like some parts of Austin that had old oak trees torn in half and thrown about. I saw some of that damage on my way into work this morning. I always feel bad for the trees - must be that Northwest tree-hugger in me.

Anyway...on to the blooms!

Salvia guaranitica - Black and Blue:


Buddleia Black Knight:


Dwarf Yellow Canna:


Purple Coneflower:


Coreopsis and Passionflower:


Yellow Cosmos:


Cuphea Ignea and Mexican Petunia:


Desert Willow:


A collection of hummingbird favorites:


Rock Rose:


Nasturtium:


Blackfoot daisy and Pink Skullcap:


Mexican Oregano:


Blue Mistflower and Lantana:


Moonbeam Yarrow:


And here is my Fuchsia 'Angels Earrings Snowfire' still blooming and undaunted by the heat and humidity. I am starting to really love this fuchsia!: